
If you notice that your fluid dispensing system is not functioning as intended, it’s crucial to take immediate action to ensure clear visibility while driving. The first step is to gather the necessary tools, including a socket set, pliers, and a screwdriver. Make sure you have a replacement unit compatible with your specific model to avoid any compatibility issues.
Begin by accessing the reservoir, which is typically located near the engine compartment. Disconnect the electrical connector and any hoses attached to the old mechanism. Carefully remove the old component while paying attention to any residual fluid that may escape. After ensuring the area is clean, install the new unit by reversing the disassembly steps.
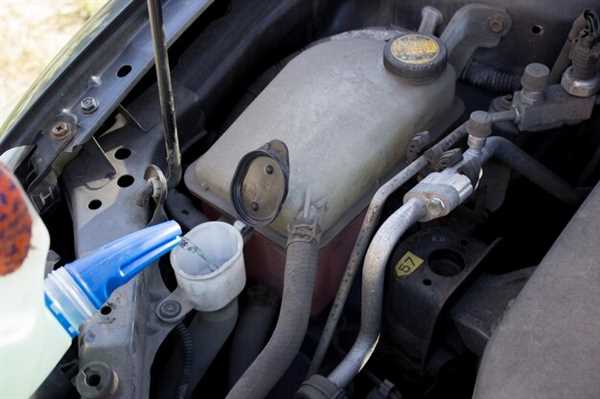
After installation, test the new unit by refilling the reservoir and activating the system. Check for any leaks and ensure proper operation. Regular maintenance can prevent future issues, making this process easier over time.
Identifying Symptoms of a Failing Washer Pump
Listen for unusual noises when activating the system. A grinding or high-pitched sound can indicate internal damage. Check for fluid not spraying onto the glass; a lack of spray suggests a malfunction. Inspect for leaks around the motor area; fluid pooling may signal a broken seal or faulty component. Observe the flow pattern; intermittent spraying or weak streams point to pump issues. If the motor runs but no fluid is emitted, the system may be clogged. Lastly, evaluate the response time; delayed activation can be a sign of electrical problems affecting pump performance.
Step-by-Step Guide to Removing the Old Washer Pump

Begin by safely lifting the front of the automobile using a jack and securing it with jack stands. This provides easier access to the reservoir area.
Disconnect the battery to prevent any electrical shorts while working on the system. Locate the reservoir, typically on one side of the engine bay.
Identify the fluid lines connected to the existing device. Carefully disconnect these hoses, ensuring you have a container ready to catch any spilled fluid.
Unfasten any mounting screws or clips securing the unit in place. Use the appropriate tools, such as a screwdriver or socket wrench, to avoid damaging surrounding components.
Gently pull the assembly from its housing, taking care not to damage any nearby parts. Inspect the mounting area for debris or corrosion as you remove the old unit.
Once detached, check the condition of the electrical connector. If it’s corroded or damaged, this may need attention prior to installation of a new component.
Dispose of the old assembly according to local regulations, particularly regarding hazardous materials. Prepare the area for installing a new device as you finalize the removal process.
Installing the New Washer Pump and Testing Functionality
Begin by securely placing the new motor in the designated area, ensuring it aligns with the mounting holes. Tighten the screws firmly, but avoid overtightening to prevent damage.
Reconnect the electrical connector by pushing it until you hear a click. Make sure there’s no corrosion or dirt on the terminals to guarantee a solid connection.
Attach the fluid hoses, ensuring they fit snugly on both the inlet and outlet. Check for any cracks or wear on the hoses before securing them, as this could lead to leaks.
Once everything is in position, fill the reservoir with washer fluid up to the appropriate level. Turn the ignition on without starting the engine to initialize the system.
Activate the new unit by pulling the lever for the washer. Observe the operation closely: fluid should spray from the nozzle consistently. If there are issues, check the connections and fluid path for blockages.
After confirming functionality, conduct a final check of the area for leaks, ensuring that everything is sealed properly.

